Configuration Console
Sage X3 Configuration Console is the configuration and administration tool required to implement Sage X3 products.
It is used to configure the Sage X3 components and to establish links between them in order to set up a solution. It produces the configuration files which will be used by the targeted sub-systems.
Since the configuration of the various Sage X3 servers is controlled from a centralized workstation, the installation of complex configurations, namely in multi-tier architecture and in heterogeneous UNIX or Win32 environments, is simplified.
An installation can take the name of a Sage X3 solution and is characterized by an alphanumeric code with a maximum of 20 characters defined in the Sage X3 Configuration Console.
To define a basic solution, the following components are mandatory:
Optional or linked components may complete the solution:
Those optional components can be shared between several solutions. They can be installed on a single machine (except for the additional process server that cannot be installed on the same machine with the main process server); it is equally possible to allocate them on distinct servers.
An administration engine, ADXADMIN service (generally set to port 1895), must also be installed on each of these servers. These administration engines communicate with the Sage X3 Configuration Console workstation, which allows the Console to control all the components stored on each server.
The configuration of the various components is based on the fact that all the configuration prerequisites for the components are respected and that all the components to be configured are already installed on the concerned servers.
To launch the configuration Console, run the Console.exe process or click the Sage X3 configuration Console icon on the Windows desktop.
The Console consists of:
| Menu | Shortcut | Action | |
|---|---|---|---|
| Console | Settings... | This is used to modify the Console parameters (debug mode, language choice...) | |
| Console | Exit | Alt+F4 | Is used to exit the configuration console |
| View | Tree view | F3 Key | Displays or not the left side list |
| View | See all modules | Displays all boxes | |
| View | Current module | Only displays the current module box | |
| Tools | Opening the global trace | F4 | Displays the console general log file |
| Tools | Management of the Adxadmin accounts | Opens the ADXADMIN account management window for accounts stored by the console | |
| ? | Console Help | Opens the online help to the Sage X3 Configuration Console | |
| ? | About the Console | Displays the information of the Console version |
When activating the left-list panel or loading a configuration screen, the main menu can be completed by two new entries containing on the one hand the specific menus of the selected entity (module) and on the other hand the action menus of the loaded configuration screen.
| Icon | Action |
|---|---|
| Return to the start-up page of the Configuration Console |
When activating a left-list entity, this tool bar is completed/modified with icons that are specific to the selected entity. They are generally shortcuts to the selected entity configuration screens.
The left list panel is made up of hierarchical list of components corresponding to the Console main entities:
Each component in the left list is a tree of entity components and their linked components.
It also includes a toolbar for importing or deleting entity components. These toolbars are described in the configuration screen specific to each entity.
The configuration screen is made up of three elements:
The Basic solution is made up of the three mandatory components required for running a Sage X3 product: the database server, the X3 application server and the X3 main process server.
To create a solution, open the Solutions component on the left list panel, and click the New Solution button of the general tool bar.

The following dialog box entitled Create a new solution is displayed; it enables to build the basic solution using the components that have already been installed on the servers:

Perform the following steps:
The process starts with the selection of the application component that refers to the product and determines the solution type.
The following dialog box entitled Create a new solution is displayed:

To select the application component to be used in your solution:
Then the Console submits a list of main process servers available for your solution in the following dialog box:

To select the main processing server to be used in your solution:
The next step is to choose via the following dialog box the configuration method for the database to be used by the solution.

Select one of the two proposed configuration methods and click the "Next" button.
Then, a new dialog box is triggered where all database components available on the indicated server are listed. Select a database component from the list and click the Next button.
For an Oracle database on a Linux platform you should use the Manual configuration method.

To enable Sage X3 AdxAdmin Administration server to connect to the data server, you need to enter all the required settings to create a virtual database component that matches your disconnected database.
For further details about database setup, refer to the Specific actions with the Configuration console paragraph.
The last phase enables you to enter an identifier, a description and a message (optional) defining your new solution.
If you enter a message, it will be displayed each time the solution is loaded onto the Console. This can be useful if you manage many solutions, adding a message on opening critical solutions is intended to avoid confusion with test solutions.

Once this information is validated, the Console displays the solution configuration screen. The setup components of the servers for the solution are loaded with the components that you have selected.

To install the solution, it is necessary to load and configure the mandatory Database server component first.
The Console is used to reference a database considered as disconnected.
The principle is to create a solution in which the database server cannot be accessed from the Console. For more information on adding a disconnected database, click here...
The component status is Idle, on exiting the configuration it becomes Active.
To configure the database server component, enter the mandatory parameters.
Only the instance in the case of SQL Server must exist beforehand.
The Configuration Console creates the database (Oracle or SQL Server) and the ODBC source (SQL Server).
Once these parameters are entered, click the Save button of the Configuration Console.
To start the configuration of the database server, click the Data button. A dialog box displaying the different configuration options appears.
Three options are proposed:

To configure the database component, select the Full configuration option and validate.
When exiting the configuration log screen, the component status becomes Active if the database configuration process ends successfully without any errors.
In order to solve the most common database configuration problems, refer to the To know... paragraph.
The configuration of these two components depends on the correct configuration of the database server component.
By a single action, the configuration of the application server and the main process server is carried out.
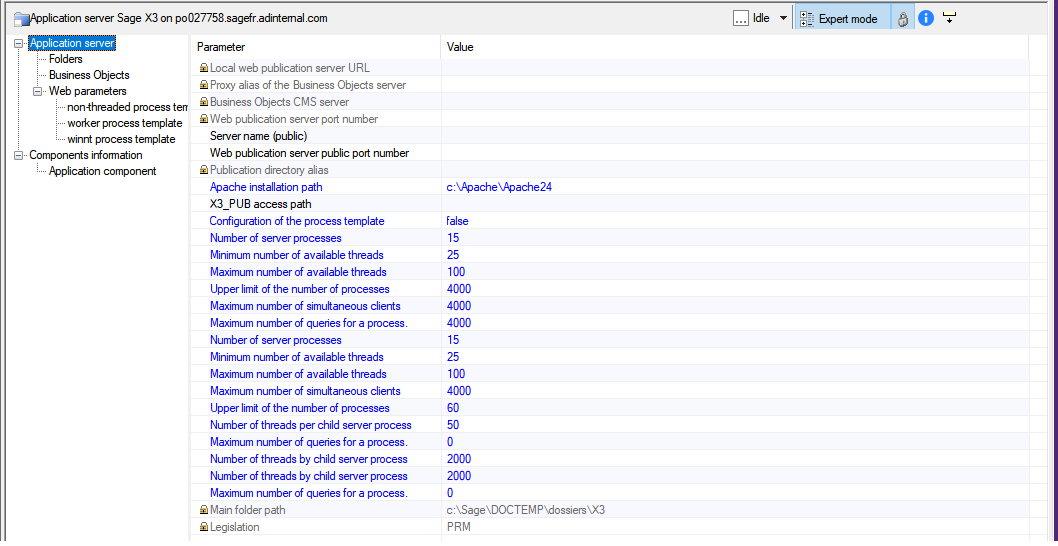
The value of the parameters needs to be checked first:

For configurations intended for a large number of users, or for the use of the HR portal module, it is possible to configure and optimize the Apache process model parameters in the advanced parameters of the application component.
These parameters can be accessed in the Application server->Web parameters->Process template after clicking the Expert mode icon of the Application panel header.
The process model category depends on the target architecture and the configuration of the Apache software.
To activate the Apache setup options, the Configuration of the process template parameter in the Web parameters category must be switched to the True value.
It is recommended to use a dedicated Apache installation when using the Apache process model parameters in order to avoid possible problems with the values of another solution using the same Apache server.

DBMS client path: ORACLE client installation path. It is necessary to click on this setup to enable the Console to search for possible values. If the ORAHOME variable is defined, the Console proposes that its value be recovered. Make sure that the version of your DBMS corresponds at least to the version of your DBMS server.Name of the link to the remote database: Access link to the database. This value must be left blank. On exiting the configuration this parameter will have as its value the name of the Runtime component.Special case:
It is important to point out that latest upgrades of Sage X3 Runtime abide by new security requirements imposed by recent database versions. So, for Oracle 19.0 database, the compatible Runtime versions to install are from 92.2 onwards.
To ensure compatibility with older Oracle database versions on mono-tier architecture, the Configuration Console requires database to be considered as virtually remote in order to enforce using the Oracle TCP protocol of the "instantclient_19_3" folder in the Runtime repository.
So, while in mono-tier architecture using a Runtime version from 92.2 onwards, if you are configuring a new solution or updating the runtime component of an existing solution, the Configuration console detects the Oracle database version.
For versions prior to Oracle 19.0 database, the following warning message is triggered:
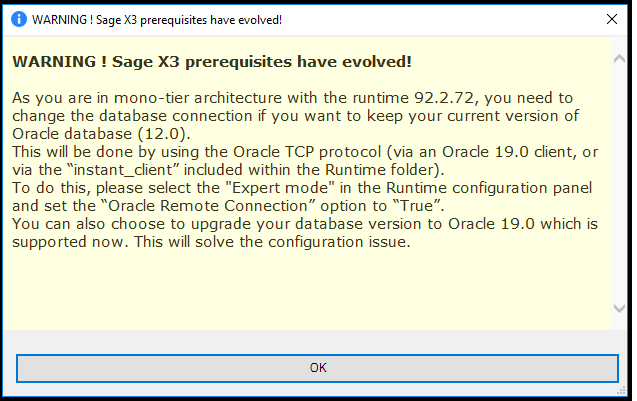
Clicking the "OK" button displays the "Oracle Remote Connection" option to set to "True":
You need to enter the InstantClient path if the parameter "runtime.odbc.dbhome" is empty.
Note that the X3 Runtime includes InstantClient in its folders. 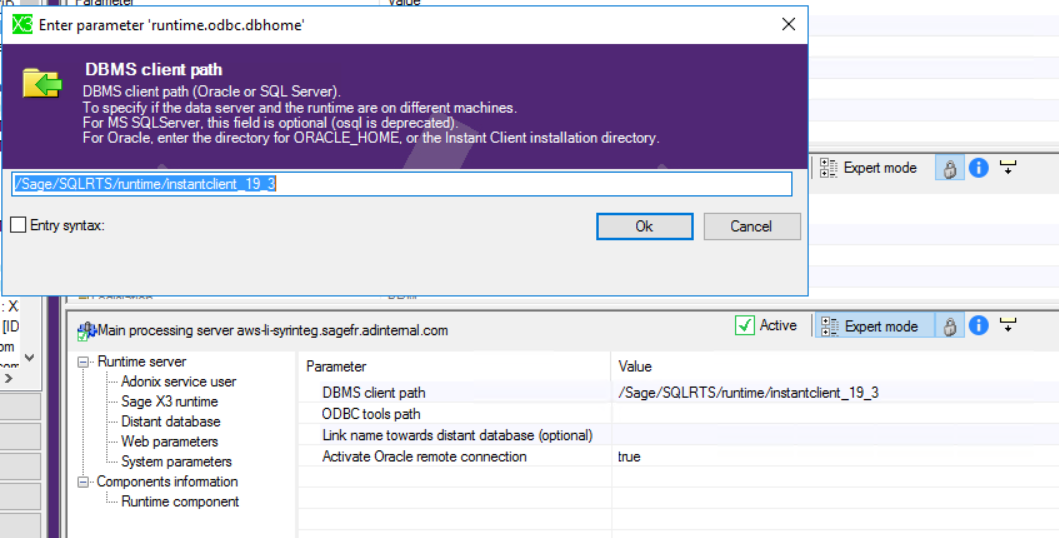
Note:
For Oracle database, the Console will create its own TNSNAME.ORA file in the "Runtime" directory of the solution. In this way, the original Oracle file will not be affected.
To launch the configuration of Application and main process server components, click on the Application button.
On exiting the configuration log screen, the ADXD process of the main process server is already started and the status of both components becomes "Active" if the configuration process ends successfully without any errors.
At this stage, the solution can be used. It is therefore possible to connect via the web browser (from the version 7) or via the Client Sage X3 workstation (up until the version 6).
To configure the file "configRuntime.json", please go to
" Sandbox configuration file / filesystem security"
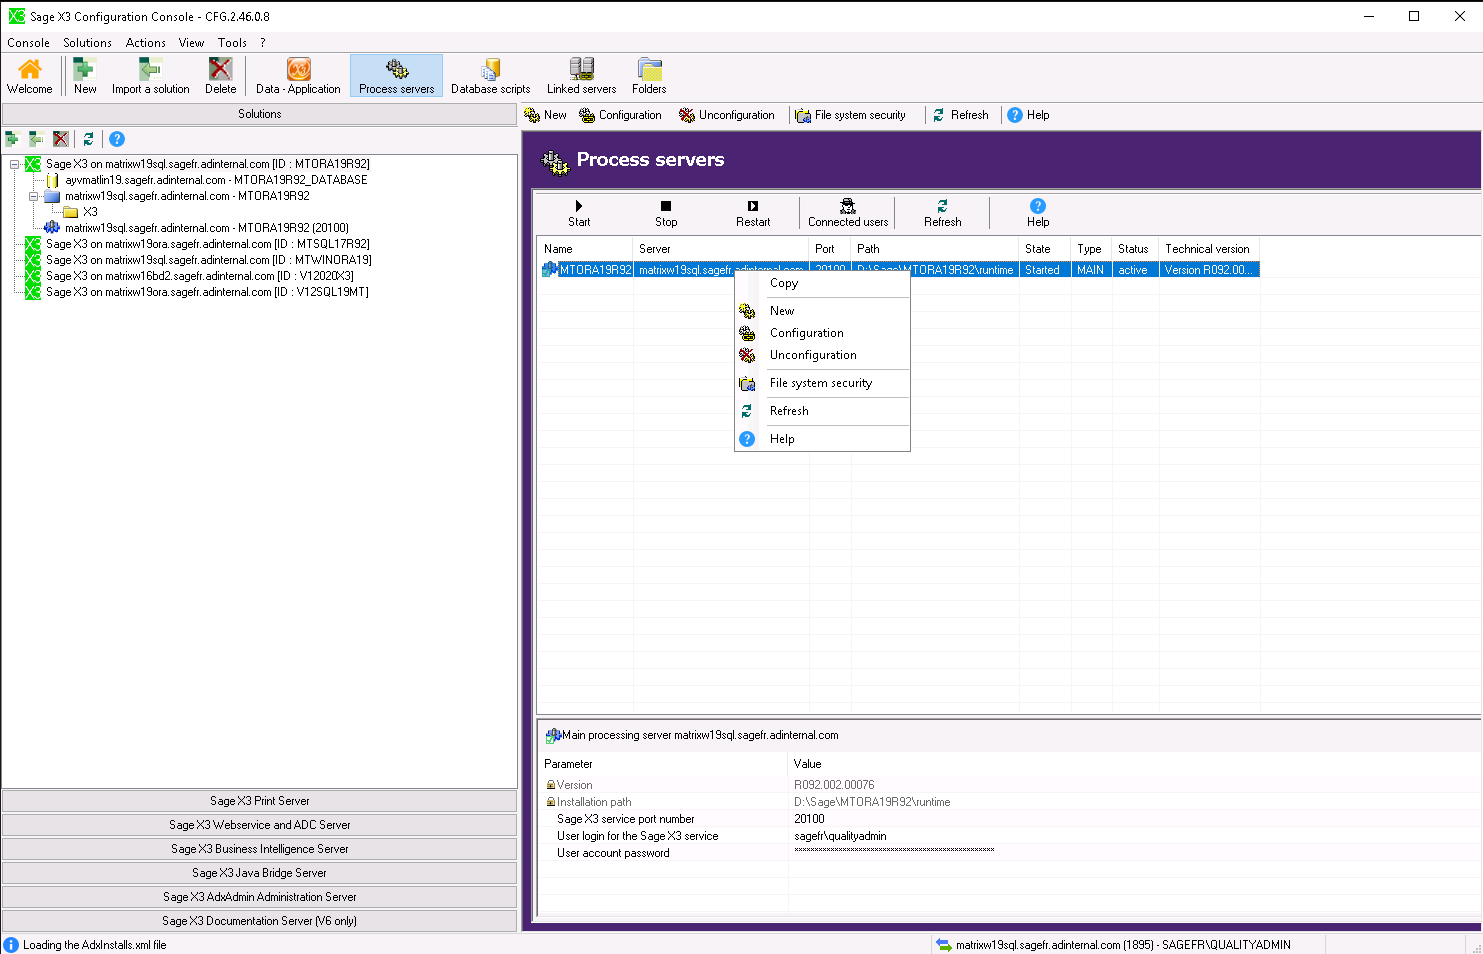
To implement an additional X3 process server, it is necessary to:
To load an Additional process server component, click the New button, in the Process servers tab.
For more information on the component loading dialog box, click here...
The component status is Idle. On exiting the configuration it becomes Active if the configuration process ends successfully without any errors.
To configure the additional process server component, enter the mandatory parameters:
To launch the actual configuration of the Additional process server component, click the Configuration button:
* The service must be created on the port chosen for the configuration of the main Processing Server. If this port is already taken on the additional Processing Server, the configuration cannot be done..
The process server can now be used. It is now possible, using this server, to connect to the application folders.
NB: After adding the process server, an update of the publications can be necessary. In such a case, the solution must be published again for the Sage X3 Web Server, the Sage X3 Java Bridge Server and the Sage X3 Print Server.
The Sage X3 Print Server component is used to assign the running of the reports and printouts to a dedicated and manageable server.
To use SAGE X3 PrintServer with Oracle 12 and 19c with a Sage X3 PrintServer <=2.19 or a Sage X3 Console <=2.46, please, follow this documentation :
Print server ODBC driver for Oracle
No more manual process is required to manage Oracle Datasource with InstantClient
"Basic Package", "SQL*Plus Package" and "ODBC package" from Oracle are automatically installed by the PrintServer setup.
The setup installs Oracle Instant Client on the station on demand.
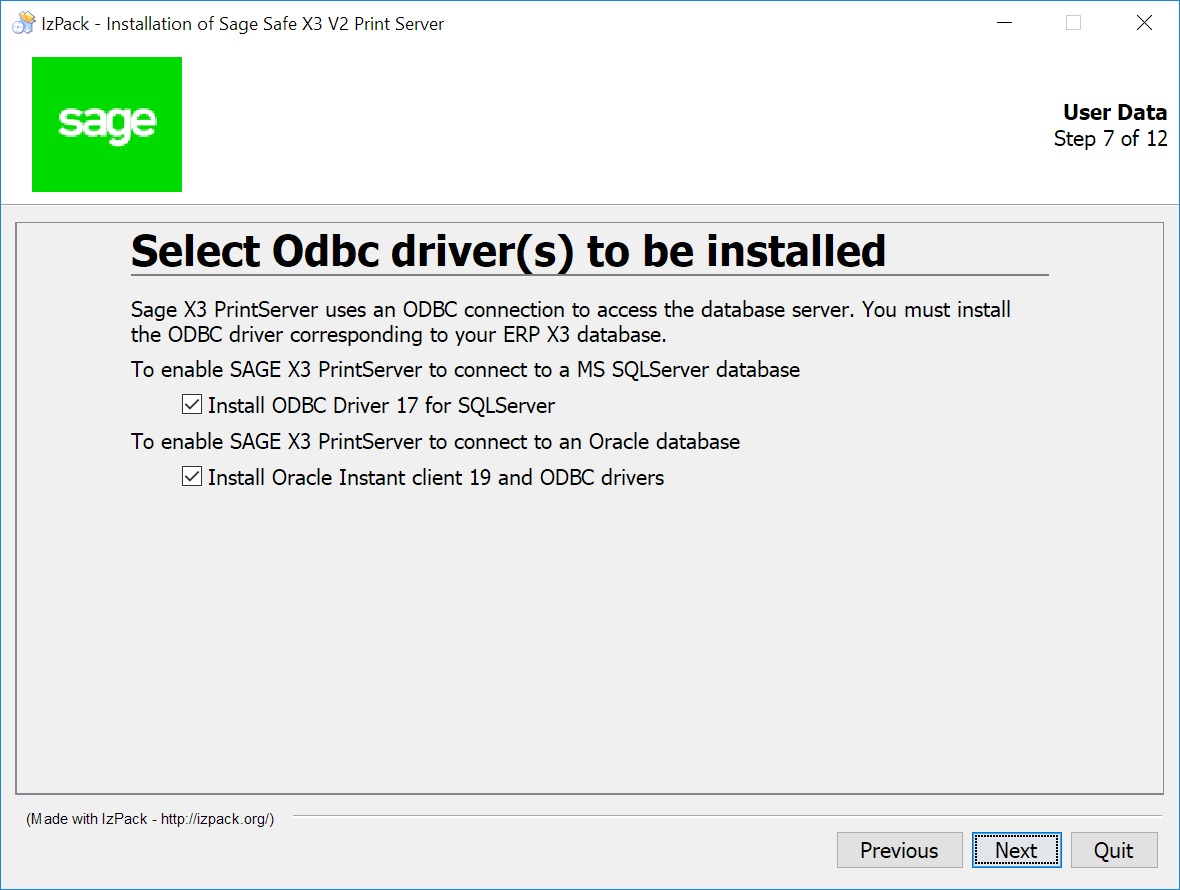
Instant Client ODBC driver is installed in the X3 PrintServer root directory.Ex: the root dir is "C:\Sage\SafeX3\EDTV2\EDTSRVFRDEP\srvedit\", the ODBC client is installed in C:\Sage\SafeX3\EDTV2\EDTSRVFRDEP\srvedit\instantclient_19_5
The entry "Oracle InstantClient_19_5" is available within the ODBC datasource manager after installation.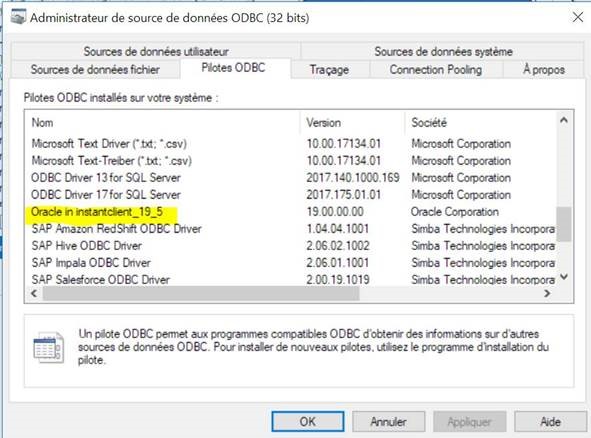
To implement the Print server, it is necessary to:
To load this component, click on the Add button of the Print servers left list.
For more information on the component parameters entry panel, click here...
The Console loads the different parameters of the Print server component.
Note that the value of the status of the Print server is "Idle" and will switch to "Active" once the configuration is done.
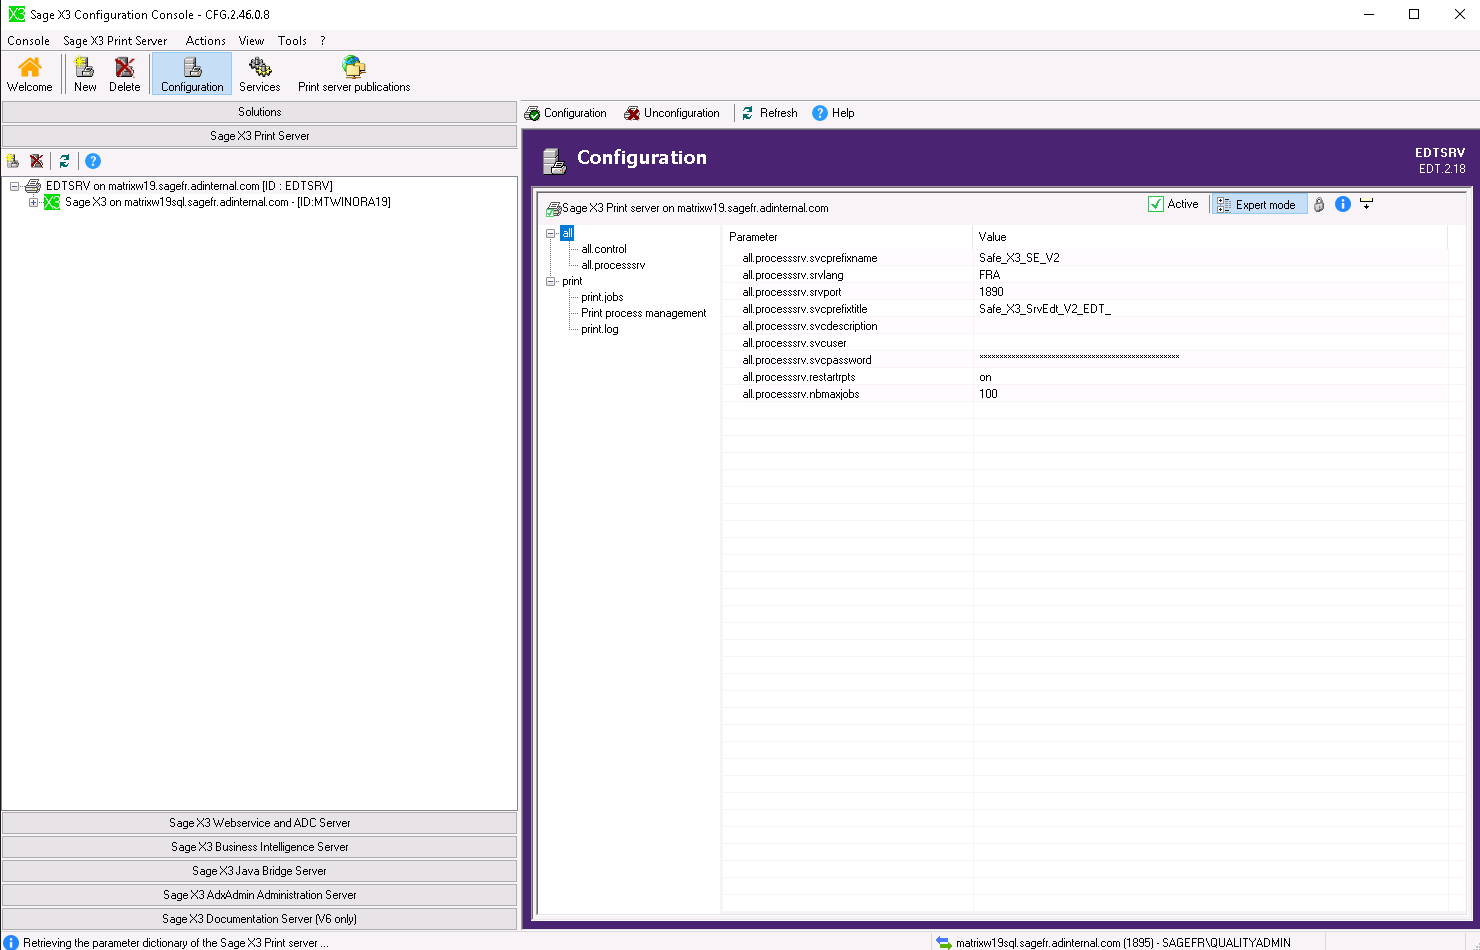
To configure the Print server component, enter the mandatory parameters:
On exiting the configuration, the component status is "Active", and the 'Safe_X3_SE_V2DEFAULT' service is created but not started;
it will be launched automatically on the first solution publication.
It is neither useful nor recommended to start this Windows service if no solution has been published.
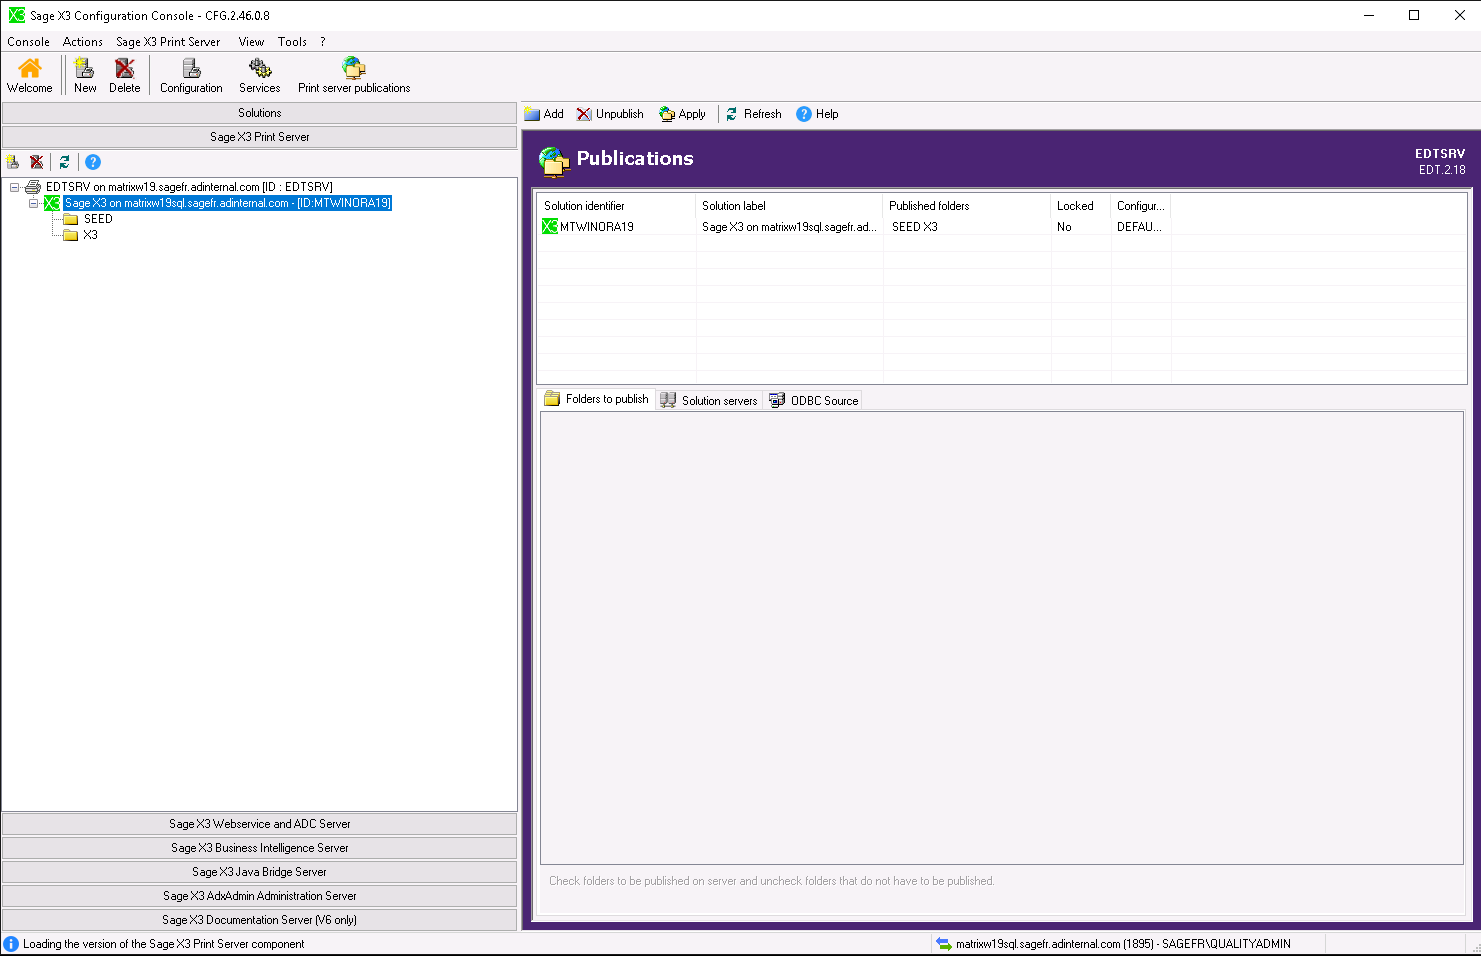
To publish the solution, select the Publications tab of the Print server component.
Click the Add button of the toolbar and select the solution to publish in the list of the solutions managed by the Console.
Once the solution has been added to the publications of the print server,
select the folders of the solution to be published via the checkboxes and validate by clicking on the "Apply" button.
If you have installed another ODBC driver that can disturb the Print Server, you can force within the Console (in the 'ODBC Source' tab) the ODBC driver to be used, for instance the InstantClient_19_5 : 
After this, you can publish the Solutions and folders with the Console.
The installation of the Print server is complete.
Print processes management :
all.processsrc.nbmaxjobs: maximum number of Print requests.
This parameter sets the maximum number of print requests that the PrintServer will be allowed to run in parallel.
This setting should be adjusted based on the average number of requests to submit and the overall availability desired for the system.
When the maximum number of jobs is reached, the server put the new print requests in a queue of pending requests.
These requests are then unpaved when one of the print processes is in the "available" state again.
print.jobs.purgetimeproc: Time before automatic deletion of an untreated print request (expressed in minutes).
Please note: printings in current execution are not taken into account. They are processed in the purge at the 'processus' level.
print.processes.nbmaxproc: Maximum number of processes (ex: AdxImpNet.exe process) the PrintServer will be allowed to run in parallel.
Default value max="5".
print.processes.killtimeproc: Maximum duration before deletion of a blocked print process (expressed in minutes).
Ex : process AdxImpNet.exe. Default value max="20".
print.processes.maxjobsbyprocess: The maximum number of jobs that a "AdxImpNet" print process can handle before committing suicide.
Default value="10".
These parameters can avoid memory leaks that SAP Crystal Report can cause.
To have more information about the PrintServer, please go to
Print Server Presentation and Operation Guide
To update the print server, follow the steps described below:
To deconfigure the print server, follow the steps described below:
To implement the Webservice and ADC server, it is necessary to:
To load the Web server component, activate the left list Sage X3 WebService and ADC Server and click on the Add button.
For more information on the component loading dialog box,click here...
The Console acquires the different Web parameters and loads the component, its parameters appear in the right-hand half of the page.
Note that the component status is "Idle". Once configured, this value will switch to "Active".
To launch the actual configuration of the Web presentation server component, click on the Configure button.
On exiting the configuration, the component status is "Active", and the 'adonix_print_server_DEFAULT' service is created and launched.
The Web server is configured, it is now necessary to publish the solution.
Pre-requisite to a solution publication : the configuration of the Apache server of the solution
To configure the Apache server of the application server, enter the "Apache installation path" setup in the Application server in the solution management screen and click on the Web publication button to launch the http server configuration for the application server.
If no value is proposed, it is pointless to continue with the publication. It is absolutely necessary to resolve the problem linked to the installation of Apache on the server.
It is possible to check the configuration of the HTTP server by launching Internet Explorer then the following URL: http://[servername]/[AliasOfSolution]/DOSB/GEN/FRA/FENW/FUSER.xml.
Note: the publication alias is in the form of 'Adonix_NameOfTheSolution'. Respect the case.
To publish the solution, select the Publications tab of the Sage X3 Web Server component .
Click on the button Add... and select the name of the solution to be published.
To update the Sage X3 Webservice and ADC Server, follow the steps described below:
To deconfigure the Sage X3 Webservice and ADC Server, follow the following steps:
The Console is used to configure the groups of web-service connections for the Sage X3 Web Server. An additional tab is available within the Sage X3 Web Server configuration panel. To access the configuration of a group of connections, the Sage X3 Web Server must be configured and the services launched. If it is not the case, the tab is not active.
it is mandatory to publish the solutions in order to configure the group of web-services connections, in fact these are configured to establish a physical connection to a solution folder and by the intermediary of the process server configured for the solution.
The configuration screen of a group of web-service connections is principally modified using three components :
the tool bar, which makes possible :
The addition or deletion of a group of web-service connections to the tree structure.
Review the configuration from the Sage X3 Web Server
the configuration of the tree structure visualization :
This tree structure represents the Sage X3 Web Server configuration and the configuration of the group of web service connections.
The following are found, in order :
The actions possible on a group of connections are determined by its status, plus the addition, deletion and modification of parameters imposes the saving of the new configuration to the server with the "Save" button, which becomes active after any configuration modification.
To add a group of web-service connections, select a process server type node from the configuration tree structure.
The "add group of connections" button becomes active in the tool bar, a group is connected to the selected process server by clicking on this button.
Entering all the visible parameters within the parameters framework then clicking on the "Save" button.
note: it is possible to add/delete and modify several connection groups and to save the configuration at the same time with the "Save" button.
To delete a group of web-service connections, select the group icon within the tree structure then click on the group deletion button in the tool bar. The group icon changes, which indicates that the group is in deletion mode.
It is then possible to save the modification by using the "Save" button or cancel the action by using the "Cancel" button.
note: Using the "Save" and "Cancel" buttons, when they are active, saves or cancels all the modifications carried out on the configuration, for all the modified groups.
To be able to use the Sage X3 Business Intelligence Server component, an AdxAdmin administration server needs to be installed on the server and started with an account different from Localsystem.
When using the Business Intelligence functionalities, it is possible to use an already existing solution to store those data specific to the Business intelligence or a solution of "Decision-support" type configured in the "Solution" module.
A "Sage decision-support" solution is a solution devoid of Main application folders and it is therefore only used to store decision-support data.
To implement a Sage X3 Business Intelligence server, it is necessary to:
To load this component, click on the Add button of the Business Objects servers left list.
For more information on the component loading dialog box, click here...
The Console acquires the various parameters of the Sage X3 Business Intelligence Server component:
Note that the value of the Sage X3 Business Intelligence Server component status is "Idle", once configured this value will become "Active".
To configure the Sage X3 Business Intelligence Server component, the following parameter MUST be entered:
Password of the administrator account: Specify the password that should be assigned to the Business Objects Server administrator account
To launch the actual configuration of the Sage X3 Business Intelligence Server component, click on the Configure button.
Right after the configuration, the status of the component is "Active" and the password of the Business Objects server administrator has been set.
To publish the solution in the Sage X3 Business Intelligence Server, server, click on the Business Objects servers then on the "Publications" button.
Click on the Add button of the toolbar and select the solution to publish in the list of the solutions managed by the Console.
A "Sage X3 user" dialog box appears and mentions the application user that the Console will use to initialize the product for the Business Intelligence support.
The Console then enables you, if need be, to choose a 'decision-support' solution to be used to store the decision-support of the Business Intelligence of the products based on the Sage X3 technologies.
If no decision-support is selected, the solution being published is used as decision-support solution and the Business Intelligence decision-support data will be stored in the same database as the data of the solution being published.
Up until the V6 version : If the solution is published on a Sage X3 Web Server, a warning message will appear during the publication and it will be necessary to update the publication of the solution in the "Sage X3 Web servers" Module of the Console by means of the Apply button in the "Publication" screen.
This will make it possible to benefit from the possibilities offered by the Business intelligence with the Web client.
If the application component of the published solution is located on a Unix type server, the Apache server on which the solution is published will have to be restarted manually.
Right after the publication, the Business Intelligence functions will be available in the application folders of the published solution.
Technical constraints limit the possible configurations upon publication of a solution. All constraints cannot be tested by the Sage X3 Configuration Console. Therefore it is the user's responsibility to comply with the following rules:
To deconfigure the Sage X3 Business Intelligence Server component, all published solutions must have been previously depublished.
Click on the button Deconfigure of the Configuration screen. At the end of the process, the component will switch from the status "Active" to the status "Idle".
It is possible at any moment to change the password of the administrator of the configured Business Objects server by modifying it in the Configuration screen of the Business Objects module of the Console.
Then just click on the Configure button to change the password in the configuration, in the Business Objects server, but also in the active publications.
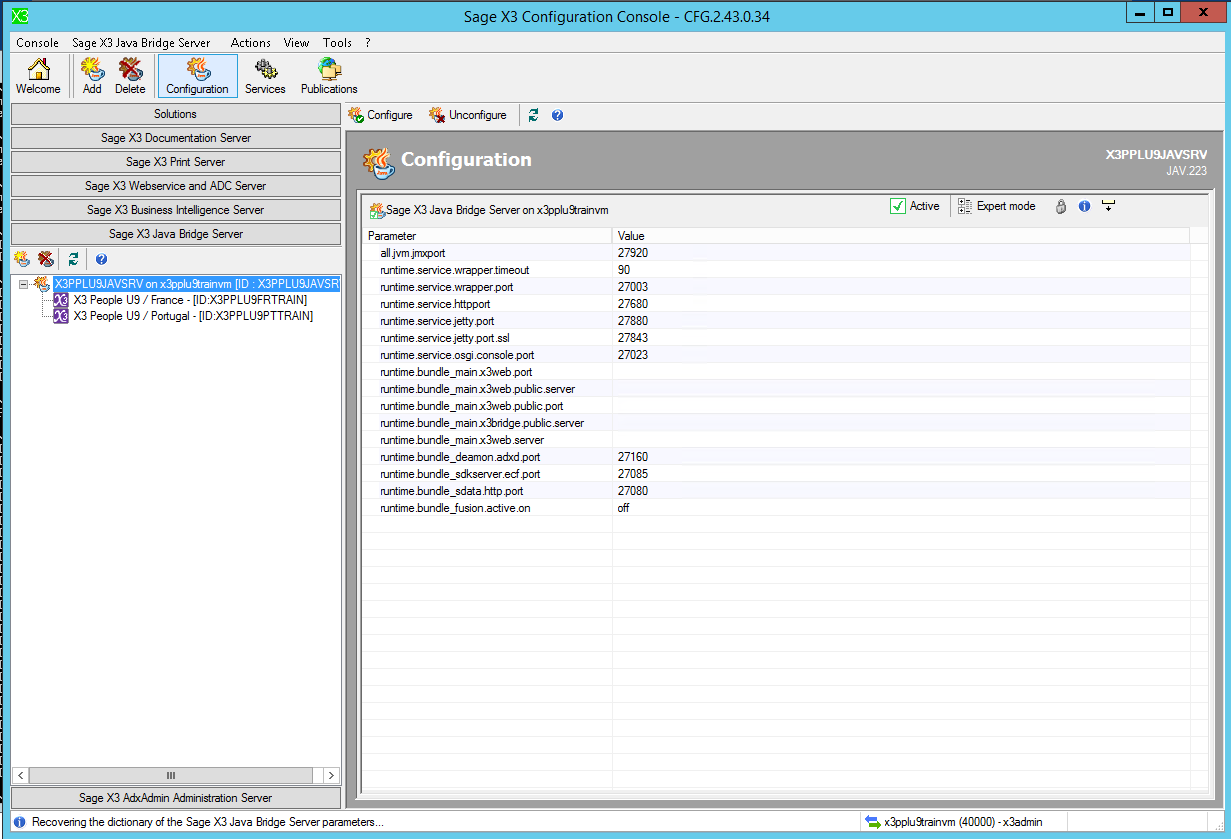
To implement the Sage X3 Java Bridge Server, it is necessary to:
To load the Sage X3 Java Bridge Server component, activate the Sage X3 Java Bridge Server left list and click on the Add button.
For more information on the component loading dialog box,click here...
The Console acquires the various parameters of the component and loads it. Its parameters appear in the right-hand half of the page.
Note that the component status is "Idle". Once configured, this value will switch to "Active".
To launch the actual configuration of the Sage X3 Java Bridge Server component, click on the Configure button.
On exiting the configuration, the component status is "Active", and the service on the host server is created and launched.
The Sage X3 Java Bridge Server is configured. It is now necessary to publish the solution.
To publish the solution, select the Publications tab of the Sage X3 Java Bridge Server component.
Click on the button Add... and select the name of the solution to be published.
To update the Sage X3 Java Bridge Server, follow the steps described below:
To deconfigure the Sage X3 Java Bridge Server, follow the steps described below:
The principal test process server is used to configure a second principal process server on the solution application server. This functionality is used mostly to test a principal process server version before its actual utilization.
This functionality could be put in place for the versions prior to the version 9.
To implement a Main X3 test process server, it is necessary to:
To load a principal test process server component, click the New button, in the Process servers tab.
For more information on the component loading dialog box, click here...
The component status is Idle, on exiting the configuration it becomes Active if the configuration process ends successfully without any errors.
To configure the principal test process server component, enter the mandatory parameters:
To launch the actual configuration of the Additional process server component, click the Configure button:
The service is going to be created on the port chosen for the test main process server configuration. If this port is already taken on the server, the configuration cannot take place.
On exiting the configuration the ADXD process of the principal test process server is created and started. The component appears in the architecture on the left and in the list of process servers.
Its status will become "Active".
The server can now be used. It is now possible, using this server, to connect to the application folders.
NB: After an additional process server has been added, an update of the publications can be necessary.
In such a case, the solution must be published again for the Sage X3 Web Server, the Sage X3 Java Bridge Server or the Sage X3 Print Server.
To update the principal test process server, follow the next steps:
To deconfigure the principal test process server, follow the next steps:
(V6 only)
The documentation server provides the applicative documentation of the configured solution. This documentation is delivered in compressed format (CHM format) on Windows environment and decompressed (HTML) on UNIX environment.
Starting from version Sage X3 V7, the product documentation is available online. However, a documentation server component exists and can be configured for the product, but it is neither configured nor managed by the Configuration Console Sage X3 V2.
To implement the Documentation server, you will need to :
To load this component, click the Add button of the Documentation server left list.
For more information on the component loading dialog box, click here...
The Console loads the various parameters of the Documentation server component
Note that the status value of the Documentation component is "Idle". Once configured, this value will change to "Active".
Access format to the documentation
Two types of access to the documentation exist. The chosen access type depends on the client used and the operating system:
Compressed format (CHM)
Decompressed format (HTML)
To configure the Documentation server component, enter the mandatory parameters:
If you choose to publish your documentation via an Apache server installed on the same machine as the documentation server, you can input the "Apache installation path" parameter. When this parameter is entered, the Console adds an alias (/AdxDoc_[DocComponentName]) in the httpd.conf of the Apache server.
If the Documentation Server component is located on a Unix server, you will have to restart the Apache server manually to take this new alias into account.
In order for the Sage X3 Client Server client can access the documentation via the Apache server of the documentation server, the value of the Documentation access root parameter must be: http://[MachineName][HTTPPort]/AdxDoc_[DocComponentName]
Once the setup(s) are entered, click on the Configure button.
It is possible to check the access to the documentation. For that purpose, click the ClientDoc.test or WebDoc.test buttons.
If the application is to be used via the Web, the documentation format must be "decompressed". To change this format, click the "Decompress (HTML)" button. After decompressing the documentation, the value of the Decompressed documentation parameter changes to 'Yes'.
Documentation installed on a UNIX server is always delivered in decompressed format. It is not useful to carry out a Decompress/Compress action.
Important reminder:No space is allowed in the documentation server installation path.
If the application is to be used via the Web, the documentation format must be "decompressed". To change this format, click the "Decompress (HTML)" button. After the breaking down the documentation, the value of the 'documentation decompressed' parameter changes to 'Yes'.
This operation is used to extract all the documentation in HTML format from the CHM file. Once the 'documentation decompressed' parameter passes to Yes, and therefore the HTML files are generated, it is no longer possible to return to the previous 'Compressed documentation' status.
It is possible to decompress the documentation at any time using the "Decompress (HTML)" button. This operation will nevertheless overwrite the html files already present if the documentation has already been decompressed.
It is also possible to "compress" the documentation in order to create a CHM file from the aleady existing html files. This operation overwrites the original CHM file and replaces it with the new CHM file generated from the present html files. It is not possible to compress a Documentation that has has not been broken down. To compress a documentation, click the "Compress (CHM)" button. In order for the CHM generation to take into account new html documentation files, these must be indexed in the current documentation. As a matter of fact, the CHM generator works in "spider" mode and finds new documentations by following the html links of the current documentation. The easiest way is to add links in the html document of the general index.
Note: These operations can take a while if the documentation is installed in several languages. Indeed, the compression or breaking down of the documentation is applied to all the languages installed for the documentation.
To publish the solution in the documentation server, click the 'Documentation Servers' button and then the "Publications" button.
Click on the Add button of the toolbar and select the solution to publish from the list of the solutions managed by the Console.
At the end of the publication, the documentation is automatically available in the 'Help' menu of the Sage X3 client.
To update the documentation server, follow these steps:
To deconfigure the Documentation Server component, follow these steps:
Folder import and export with the Console
The Console is used to import folders into your solution.
It updates the sequence numbers for each table and creates the Folder record.
There are two import functions in the Sage X3 Configuration Console.
The first function is the Import a folder. from a a backup (file copy) with a SVG data directory containing the flat data to be imported.
The Console folder Export a folder. makes it possible to perform this operation in a simple way.
The other function is used to Recopy a folder. directly from another online solution, by means of an assistant.
Therefore it is no longer necessary to go through manual backup/export/restoration phases to copy the folder of a solution to another.
The various options and possibilities offered by the import functions of the Console make it possible to meet a wide range of requirements in terms of folder copy/restoration/migration.
The folder export function carries out the creation of a SVG directory containing the flat data of a folder.
The goal is to make possible the later import of the folder into another solution by means of the folder import function.
To export a folder, launch the Sage X3 Configuration Console and click on the Export button in the Folders tab of your solution after choosing the folder to export.

In the dialog box choose the directory containing the extracted flat data. The Console suggests SVG by default.
The option "Export data to Native dump files" uses native dump mechanism from Microsoft SqlServer and Oracle,
which are faster than the SVG format for big volumes.
The Console launch "bcp" (Bulk Copy utility) on Microsoft SQLServer, and "exp" (Export Data Pump) on Oracle.
A file [folderName].pdmp is generated with Oracle and exp, located in the SVG directory, and bcp generates one file [TableName].dmp for each table to export.
The last checkbox "Delete the SVG directory before export" is set to "True" by default. In this case, the mechanism deletes the entered SVG directory, if it already exists, before starting the export process. If this checkbox is set to "False" and the entered SVG directory already exists, then existing files remain in the repository, new files will be added in the repository and those with the same file name will replace the existing ones. This option is to be handled carefully to avoid any database errors after a subsequent import of this repository.
A last warning message is triggered after you confirm your choice by clicking the "OK" button.
The following methodology is based on the fact that the folder to be imported has been extracted and copied in the directory structure of your application folders (same volume as the root folder). The tables have been flat exported to a directory using the table export function of the X3 application or the export function of the Console.
[ApplicationServerPath]\FOLDERS\[ApplicationServerPath]\FOLDERS\X3_PUB\]Warning:
Business Intelligence: When importing a demonstration folder provided on the product DVD, if the Business Intelligence functionalities need to be operational in the folder at the end of the import, the solution MUST have been published on the Business Objects server prior to the folder import.
Import a folder
To import a folder, launch the Sage X3 Configuration Console and click on the Import button in the Folders tab of your solution.

In the dialog box choose the folder to be imported and the sub-directory that contains the extracted flat data.
The Console proposes automatically SVG if it is present.
Importing a folder to an Oracle database
In the import of the folder to an Oracle database, the Console is used to specify the size of the tablespaces.
Importing the folder to an SQL Server database
In the import of the folder to an SQL Server database, the Console is used to specify that the folder import will be carried out in a new group of files:
Use the groups of files (checkbox selected) : the folder import is going to create two files Sql Server:
[DataBaseName]_[FolderName]_DAT.ndf to store the data. [DataBaseName]_[FolderName]_IDX.ndf to store the indexes.
The use of file groups is advised for improved performances.
In this configuration, it is possible to specify the initial sizes of the data and index files.
Do not use the file groups (checkbox not selected) : the folder is carried out in the primary data file:
[DataBaseName]_data.mdf.
Import parameters
The Console is able to manage some initializations of the imported folder.
If you are in Sage X3 V6, you need to supply a connection user of your application, the Console will then record with this user the newly imported folder record.
It is therefore advised to enter the ADMIN user of your application.
This user must be valid and be able to log on to the root folder of your solution.
This is no more the case if your version >= 9.
The "Reference folder" and "Copy folder" parameters show the former parameters of the folder that need to be imported.
Moreover they enable the selection of those to be used upon creation of the folder record among the the list of folders that already exist in your application.
It is possible to import the archived folder of your folder at the same time as the folder.
For that purpose you need to specify the archived folder to be imported in the drop-down menu provided for that purpose if the latter has not been preselected already.
If you do not select any archived folder, the folder record will be modified accordingly.
You might lose any already existing archived folder!
But if you select the checkbox "Transfer only Historical folder" then the data import will only be carried out for the archived folder,
which makes it possible for it to be imported after the folder to which it is associated.
The SVG directory of your archived folder must have the exact same name as the SVG directory of the folder you wish to import!
The checkbox "Import of the table structure only" allows the total import of the folder structure and any archived folder associated to it.
On the other hand, all the tables of the imported folders will be entirely empty.
Therefore it will be impossible to log on to either this folder or the associated archived folder.
This option is useful in cases of folder imports with large volumes of data,
because it is then possible to import the folder structure via the Console and to restore the database data via an optimized method
in an end-of-import script launched by the Console (see init_console in paragraph "to know")
The option "Import from .dmp files, with Bulk Copy utility" means the folder to import has been exported with bcp
and the SVG folder to import contains .dmp files. It is the best solution to optimize import of large volume of data.
Note that Dump files are managed with both Microsoft SQLServer and Oracle.
The Console calls bcp tool on Ms SQLServer to import data (Bulk Copy Program), and exp utility on Oracle (Oracle Data Pump).
To import a folder from another solution, launch the Sage X3 Configuration Console and click on the button "Remote import" in the Folders tab of your solution.
An assistant will guide you through the phases necessary for the copy of your folder from one solution to your current solution.
By means of this assistant, it is also possible to migrate a V6 folder from an online solution without any additional manual or technical stages.
Nota : in order to use the remote import function with a solution installed on a Unix type server, the "tar" and "gzip" utilities must be installed and available in the PATH.
phase 1 of the remote import wizard


This screen is used to select the online folder to be imported into your current solution from the online source solution.
Only the folders from volume A are listed.
phase 2 of the remote import wizard

This screen gives the opportunity to choose whether the archived folder should be imported at the same time as the online folder.
The archived folder is detected automatically.
phase 3 of the remote import wizard

This screen is used to define the export options of the source folder to be migrated.
Two options are possible based on the compatibility and required performances.
The first mode uses the neutral flat file format in an SVG type directory whose name shall be specified.
This format enables lesser performances but it makes it possible to migrate the folder of a solution using an SQL Server base to Oracle and vice-versa.
This format is not adapted to very large volumes but it is adapted to a migration with database type change.
It is possible to check the box "Do not export the data", which would only export the folder structure with all the tables empty.
The data can be imported via a customized script launched at the end of the import by the Sage X3 configuration Console and by means of optimized external tools.
The second mode uses the proprietary export tool of the source database for the data as well as an SVG format with empty tables for the folder structure.
This mode is adapted to larger volumes but it limits the target database to the same technical platform as the source database.
An Oracle export can only be read to feed an Oracle database and an SQL Server export can only feed an SQL Server database because the tools being used are 'exp' for Oracle and 'bcp' for SQL Server.
The Console does not manage external tools enabling the conversion of technical database platforms.
The advised platforms for this mode of operation are Oracle 12 and 19 and SQLServer 2016 and superior.
If this mode is chosen, the database export will automatically be restored in the target database using the same options and tools.
If you are in X3 v6, the password of the database administrator must be entered in this screen because it is necessary for various tasks like the sequence export.
phase 4 of the remote import wizard
This screen contains the same options as the saved folder standard import screen.
Please refer to the explanations about the creation option for file groups, tablespace sizes, reference and copy folders, etc.
An additional field can be used to rename the folder during its transfer.
This field cannot be accessed in some situations where the Oracle proprietary export option is used
(exp and imp utilities are used).
phase 5 of the remote import wizard
A standard progress window shows the progress of the folder migration phases.
In case of errors, you should look at the log files in order to know why the progress has failed.
The folders are extracted to a compressed archive that is transferred to the target server. From here,
the archive reconstructs the folders in volume A, then, the standard folder import is launched with the options defined in the wizard.
Once the folder import in the Console is over, you have to:
WARNING : Do not import a folder of a higher version or with a patch level higher than the main folder of your solution.
At the end of the import, it is possible to automatically run a user script.
For instance, this script is used for integrating data into the database via customized and optimized commands after importing the structure of a folder in the normal process,
via the Configuration Console, but with empty tables.
Using such a user script is particularly recommended to copy folders having an important data volume and to benefit from the best performances while using the optimized tools from the target architecture.
In all import cases, remote or not, the Console will detect the presence of a file init_console[.cmd|.sh] in the directory of the folder to be imported and will execute this command file if it is present.
For example, let's imagine you import the folder SEEDNEW, directory "folders" in "/Sage/SQLLINUX01/folders", the init_console script is located at this place :
/Sage/SQLLINUX01/folders/SEEDNEW/init_console.sh
The .cmd ou .sh extension is determined according to the platform on which the folder is imported.
The Console is sensitive to the return error codes and to the standard strerr output.
If an error is detected, a warning is issued during the import phases and the standard strerr et strout outputs are displayed in the import log file.
Here is an example of customized Unix/Oracle script particularly useful in case of remote import or folder migration because it makes it possible to copy data from one base to another,
directly via a link network and, consequently, to use the powerful Oracle datapump tools to manage the data.
This script is an example used to explain the mechanism of customized scripts at the end of an import,
it does not constitute any reference and any deployed script must be deployed subject to the architecture and the target needs.
#!/bin/bashORACLE_HOME=/opt/oracle/product/11.2.0.1ORACLE_SID=ORCLNEWFOLDER=NEWFOLDEROLDFOLER=OLDFOLDERexport ORACLE_HOME ORACLE_SID NEWFOLDER OLDFOLDER################################################ Drop all folder sequences and truncate tables$ORACLE_HOME/bin/sqlplus -L NEWFOLDER/tiger << EOFset serveroutput onBEGINFOR s IN (SELECT SEQUENCE_NAME FROM USER_SEQUENCES WHERE SEQUENCE_NAME LIKE 'SEQ_%') LOOPdbms_output.put_line ('Processing table ' || SUBSTR(s.SEQUENCE_NAME,5));EXECUTE IMMEDIATE ' DROP SEQUENCE ' || s.SEQUENCE_NAME ;EXECUTE IMMEDIATE ' TRUNCATE TABLE ' || SUBSTR(s.SEQUENCE_NAME,5);END LOOP;END;/EOF################################################ import data with datapump and dblink$ORACLE_HOME/bin/impdp system/manager DIRECTORY=dmpdir SCHEMAS=$OLDFOLDER NETWORK_LINK=OLDDB REMAP_SCHEMA=$OLDFOLDER:$NEWFOLDER INCLUDE=TABLE_DATA,SEQUENCE TABLE_EXISTS_ACTION=REPLACEIn this Unix script example, we consider that the option 'Import table structure only' has been used. That is why the first part of the script consists in "preparing" the folder by suppressing all the sequences that were initialized with a minimal value and not with the real value as a result of the previous option. Then, just in case the script were run several times, all the tables are carefully emptied before effective import of data.
Finally, in the last part of the script, the Oracle datapump is used via a link network to copy data and sequences directly from a base to another. It is not necessary to copy other data since the configuration Console has already created the complete folder structure, the objects and the rights.
You encounter an error of type "User SYS cannot connect to database: SP2-0640: Not connected".
In order to solve the most common problems upon configuration of the databases, consult the field "To know" by clicking here...
You encounter an error of type "cmd538647161.sh: line 3: gzip: command not found" when you use the remote import function.
You are trying to transfer a folder from or to a solution installed on a Unix server but the 'tar' and 'gzip' utilities are not installed or available in the PATH.
After the import of a folder via the Console, the folder does not appear in the solution Folders tab.
The Console could not complete the creation of the folder record. Consult the log file in order to determine why the folder record creation was interrupted. So that the imported folder is displayed in the solution folders list, it is necessary either to save the record for your imported folder from the parent folder in the case of the duplication of a folder or revalidate the imported folder from the parent folder in the case of a migration of a folder from a previous version.
Beware that the import of very large folders via the Console can take a long time (more than 2 hours for valfil).
When the Console launches an action on the server, it waits for a response with a maximum timeout (by default 720000 milliseconds that is 2 hours). It is possible to increase this timeout in the Console preferences. Solution tab, field config.solution.comm.timeout.long.
Increase this value if the 2 hour timeout is insufficient and blocks the importation of your folder. The field must be entered in milliseconds. It is possible to add the field to the list of values if it is not already present in this list.
Error "AINSTCONS : the process does not exist in the archive"
At the end of the import, the Console logs on to the application via the root folder in order to initialize the newly imported folder.
Once it is connected, the Console launches the INIT_CONSOLE function of the AINSTCONS process.
If the message "AINSTCONS: the process does not exist in the archive" appears, you need to update your application by carrying out the available patches and restart the import.
To move the tablespaces of your database after its configuration by the Configuration Console, it is imperative to modify your 'adcrap' file and the tag 'database.adonix.oradirdat' in the 'adxinstalls.xml' files of the data server and in the 'solution.xml' file of your application server
This functionality allows you to integrate a data server not accessible by the Configuration Console into a Sage solution. The two main cases where the console cannot access the data server are:
* The data server operating system is not supported by Sage product scripts.
* For strong security reasons, we do not want the Configuration Console to access this data server.
In these specific cases, no ADXADMIN administration engine is therefore required on the data server.
Pressing the "Data" button triggers the generation of basic creation scripts locally, but they are neither transferred nor executed on the data server.
Since the console does not have access to the data server, it is your responsibility to manually transfer and execute the generated scripts.
You must create the directory structure on the target server as you have specified in the configuration of the database component.
You must then launch the basic creation scripts that you previously deposited in your script directory:
* For a sqlserver database on Windows server, run the "database_CrDb.bat" script.
* For an oracle database on Windows server, launch the various scripts "cr (number)base_ORASID.cmd" in the indicated order.
* For an oracle database on Unix server, launch the different shells "launch_ORASID(number).sh" in the indicated order.
If you create a disconnected database using your own scripts or if you modify the scripts generated by the console, the following prerequisites must be observed:
* the SID of the database must be a capital character string,
* the base must be in UTF8 or AL32UTF8,
* the open_cursors parameter must be at least 300.
When configuring the database prior to the integration of the main folder, the Configuration Console needs to launch the "role.sql" script for creating the application roles. This script is created in the "tmp" directory of the connection server main. To do this, the console uses the DBMS client configured with the main connection server and the SYS account previously configured in the database component. It is therefore important to keep the password of the SYS user up-to-date in the Database component.
If you encounter a "User SYS cannot connect to database: SP2-0640: Not connected" error, there is two major common reasons:
1. In case of remote or disconnected databases, it is essential to have an Oracle listener configured and started.
1. For Oracle databases mainly on Unix platform, you may be required to authorize remote connections of the SYS user using the Oracle utility "orapwd". In this case, your Oracle database administrator has to create a password file for your Oracle instance with the "orapwd" utility. Normally, this file is created by the 'launch_ORASID_3.sh' script generated by the Sage X3 configuration console; check that the owner of this file is the owner of the database software installation, the more often it is the 'oracle' user.
Make sure of these prerequisites before configuring the 'Application' component of your solution in the Configuration Console.
When configuring the main Processing Server component, you have to enter the DBMS client path in the advanced settings of the "remote base" panel. Check that the version of your DBMS client corresponds to the version of your DBMS server.
This dialog box is used to load the Configuration Console with the components installed on a server during the installation phase. This dialog box is also used to import solutions or components that are already configured.
The first dialog box Server choice is used to enter all the relevant connection information to establish a connection with the target server. For future connections, the console saves information used upon each successful connection. If the server does not exist in the list it is possible to add it by clicking on the New button.
When a new server is entered, the port number and the user are pre-registered. These default values can be modified. Set the Edit checkbox to 'True'.
The mandatory fields are:
* Server name: Name of the server where the component is located.
* Port number: Adxadmin service port number. The default service port number is 1895.
* User: A server user account with access rights to read and carry out modifications to the component files, and system habilitations to configure and start new components.
* Password: User password to authenticate the connection.
AdxAdmin process rights
The AdxAdmin process must be launched either by a user having the adequate rights to configure the component, or from a local account having the Administrator rights ('LocalSystem' for Windows, or 'root' for Unix). In the latter case, the operations are carried out under the account entered in the connection box, this account must therefore have sufficient rights.
In the case of an Oracle database component, this user must have sufficient rights to create a database. For that purpose, the user account must belong to the ORADBA or DBA group and hence enjoys the SYSDBA privilege. Also, for the automatic creation of the SYS remote connection authorization file (orapwd with Unix), this account should be the owner of the Oracle DBMS installation. For further details, refer to Specific actions with the Configuration console record.
If the connection to the adxadmin service of the remote server is correctly carried out, the Sage X3 Configuration console offers a selection of components to install or import depending on your context.
Select from the list the component to be loaded. Click the OK button to close the dialog box and load the component.
This panel is used to setup all components needed for configuring a solution.
The setup entry panel is made up of two parts:
* The title bar.
* The list of parameters.

The title bar displays the component type and name, and indicates the server where it is hosted. It also specifies the component status: Idle, Active, Update, Unknown status!.
On the right of the title bar, a tool bar includes several icons for different actions.
Component status
The component status is located to the right of the title bar. Based on a specific parameter value of Adxinstalls.xml file, is automatically refreshed each time the component is loaded. So, if you update a component by means of the installation script, the "Update" sttus is automatically detected by the console.
The tool bar
It is a horizontal series of icons located on the far right of the title bar:
| Icon | Action |
|---|---|
| Activates or not the Expert mode display | |
| Displays or not the locked parameters | |
| Displays or not setup information | |
| Displays or not setup information message about the parameters input |
The display modes
Parameters are displayed according to two display modes:
* Standard mode: displays basic and mandatory parameters.