Certificate Installation
The trusted connection between node servers and Sage X3 servers is based on signed certificates. This document explains how the certificates must be set up.
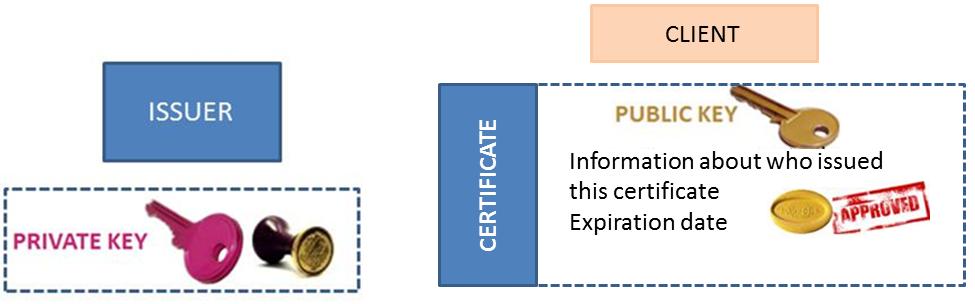
In public key cryptography, the public key can be distributed to many people while the private key should be kept private. Only the holder of the private key can decrypt data that has been encrypted using the public key.
You can compute the digital signature of data using the private key. Anyone who has the public key can verify the digital signature, and thus make sure that the data has not been changed. It is almost impossible to change data without changing the signature, or to compute a valid signature without the private key.
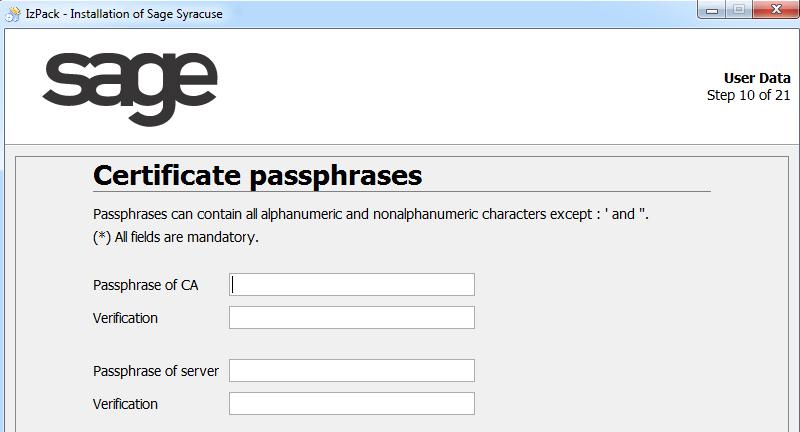
The private key is very sensitive and it is usually encrypted using a passphrase (similar to a password but more complicated). You can only use the private key if you know the passphrase.
A certificate is a bundle containing a public key, a digital signature and some additional data. Certificates always involve two parties:
Certificates contain:
The certificate allows you to make sure that the subject of the certificate has the corresponding private key.
This diagram summarizes the components that are set up for certificate management:
The first step is to create a master certificate (or CA certificate). It is used as a certification authority (the issuer and subject are the same) and it identifies a domain of trust for your company or organization.
For stronger security, the certificate must be generated on a secure server, and the private key must never be transferred. The master certificate, however, can be transferred on different node.js servers as illustrated in the diagram below:

In this diagram, you can see that only one master certificate exists, and that the corresponding private key is kept safe on a master secured server while the certificate is distributed on each node.js server.
The second step is to create a private and a public key, as well as a certificate for each node.js server. They are generated using the master certificate and the master private key. The issuer is the certification authority and the subject is the node.js server.
This step secures the connections to Sage X3 and it can also secure the connection between node.js servers. Every time a connection request is sent from a node.js server to a Sage X3 server, encrypted data is sent. The Sage X3 server can identify the server that connects using the public key and ensure the authentication. This is why there are as many certificates as there are node.js servers.
This corresponds to the following diagram:

In this diagram, you can see that there are as many certificates and private keys as there are node.js servers. The private key and certificate remain on the node.js server, while the public key is distributed to the Sage X3 servers. The Sage X3 servers then receive a connection from the corresponding node.js server.
Note that the Sage X3 servers will only get the public key, without the certificate itself or the private key.
While it is impossible to completely automate the generation and distribution of certificates and keys for security reasons, there is a simplified method that allows an automation of the installation.
This method was designed for cases where a unique node.js server is installed on the network.
Note that:
If you want a separate server to create the certificates in a very secured environment, run the complete generation procedure instead.
The key generation takes place during software installation.


The key generation process consists in:
Pre-requisites:
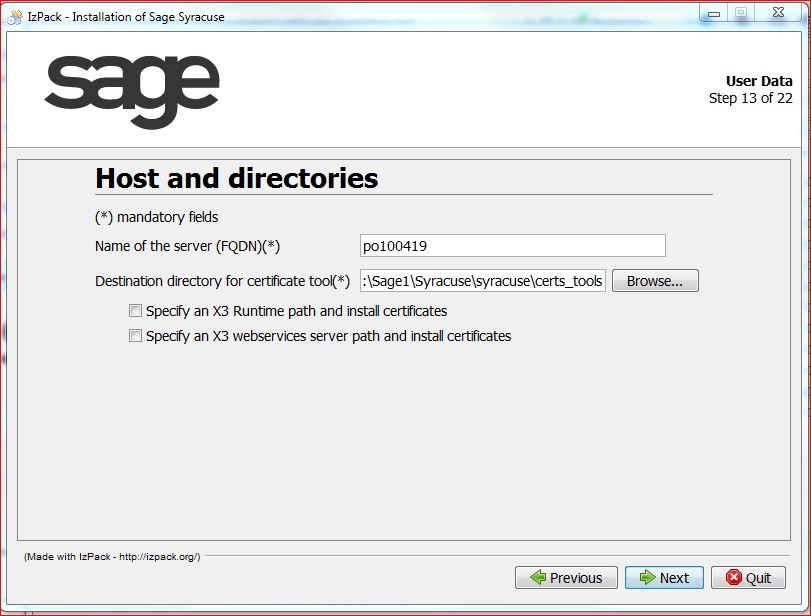
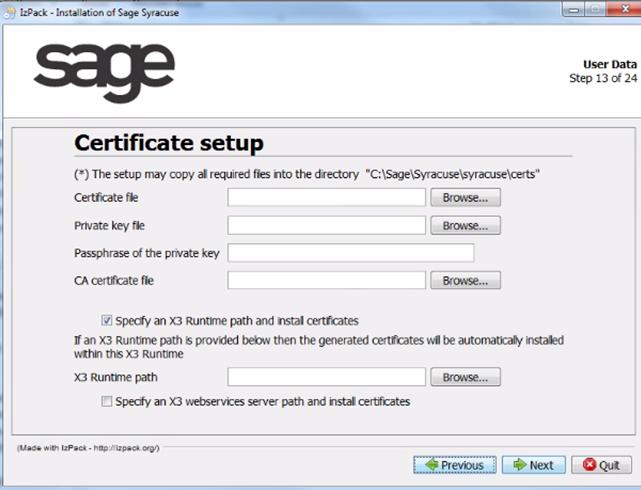
To generate the certificates:
java -jar certgen.jarFor a complete list of program options, refer to the appendix.
At the end of the process, the output subfolder contains the following files:
The name is always the hostname of the server in lowercase.
Each node.js server has to authenticate against each Sage X3 server it invokes. There are two possibilities:
If the x3server entity has certificates that are declared, you have to copy the public key file (with a ".pem" extension) for the certificates into the keys subfolder of the Sage X3 runtime. You also have to copy this file in the \data \KEYSTORE \WEBSERVER \ subfolder if the webservice ADC server is installed.
This applies to certificates that were not manually installed for node.js servers. You can also generate new certificates by using the certificate generation tool and install them on all node.js servers by adding a new instance of the certificate entity.
If the x3server entity has no certificates declared, you have to copy all public keys of the node.js servers (all ".pem" files of the output folder of the certificate generation tool) into the keys subfolder of the Sage X3 runtime. You also have to copy these files in the \data \KEYSTORE \WEBSERVER \ subfolder if the webservice ADC server is installed.
This step must be performed each time you add a new node.js server.
We can illustrate this last option by using an example where you have two node servers (A and B), and two Sage X3 servers (1 and 2). If you want the Sage X3 server 1 to accept connections from both node.js servers (A and B), and Sage X3 server 2 to accept connections only from node.js server A, the deployment policy is summarized in the following table, where:
| Type of file | Installed on | ||||
|---|---|---|---|---|---|
| Secured CA server | node.js server A | node server B | Sage X3 server 1 | Sage X3 server 2 | |
| CA certificate | available | yes | yes | no | no |
| CA private key | available | never | never | never | never |
| Certificate for server A | generated | yes/transfer | no | no | no |
| Server A private key | generated | yes/transfer | never | never | never |
| Server A public key | generated | no | no | yes | yes |
| Certificate for server B | generated | no | yes/transfer | no | no |
| Server B private key | generated | never | yes/transfer | never | never |
| Server B public key | generated | no | no | yes | no |
Certificates, private keys, and their passphrases are very sensitive data that cannot be stored in the database. Instead, it is kept in a folder of the local file system with limited access rights. The encrypted passphrases are kept in a separate file in the same folder.
On customer site, the administrator generates a private key and a self-signed certificate which acts as the certification authority. For each server in the cluster, a certificate and a private key are generated in such a way that the certificate can act as a server certificate for HTTPS. The certificates are signed using the previously generated self-signed certificate.
The administrator uses a command line tool to generate the certificates. The tool is independent from the node.js installation folders and must be run on a separate computer. The following is a list of possible use cases for this tool:
For the last option, the CA certificate must have been manually copied to the node.js servers so that the node.js servers can make sure they can trust the data. Alternatively, you can add a "-notransfer" switch to the invocation of the tool to switch off all transfer options.
When node.js cannot be reached, the tool stops with an error message. It you set the "-wait" option with a positive number, the tool will try to connect to this port several times for the number of seconds specified. If you set the "-port" switch with a positive number, the tool will transfer the data to the node.js server, even in batch mode.
When the tool is started for the first time, it creates an output folder and a private folder as explained in Complete generation procedure. This separation reduces the risk of copying the CA private key unintentionally.
The tool will also generate the certificate and private key of the certification authority. All other actions will be rejected. To do this, it needs:
When the CA certificate is available, the user can perform a number actions. If the corresponding command line parameter is not given, the action will be asked interactively. Note that the CA passphrase will only be prompted once when you do several actions within one session of the program.
This action requires:
Note: Unless the "-notransfer" switch is set, you will be prompted for the port of a node.js server. If you enter a valid positive port number, the data will be transferred to that server using encrypted HTTP requests.
This action generates a new certificate with the same subject but a different validity. It requires:
Note: Unless the "-notransfer" switch is set, you will be prompted for the port of a node.js server. If you enter a valid positive port number, the data will be transferred to that server using encrypted HTTP requests.
This action changes the validity of the CA certificate and all server certificates in a single action. It requires:
Note: Unless the "-notransfer" switch is set, you will be prompted for each port of node.js servers, one after the other. If you enter a valid positive port number, the data, including the new CA certificate, will be transferred to that server. This does not work in batch mode.
This action generates a new pair of public and private keys, and generates a new certificate with the same subject and validity, but containing the new public key. When this is applied to the CA certificate, it automatically signs all server certificates with the new key. It requires:
Note: Unless the "-notransfer" switch is set, you will be prompted for the port of a node.js server. If you enter a valid positive port number, the data will be transferred to that server using encrypted HTTP requests. When you change the key of the CA certificate, you will be prompted for each port of the node.js servers, one after the other. If you enter a valid positive port number, the data, including the new CA certificate, will be transferred to that server. This does not work in batch mode.
This action changes the subject of the certificate without changing the validity. If applied to the CA certificate, it changes the issuer of all CA certificates and signs them again. When the subject of the certificate is identical to the issuer (except for the common name), the subject (except for the common name) will also be changed. It requires:
Note: Unless the "-notransfer" switch is set, you will be prompted for the port of a node.js server. If you enter a valid positive port number, the data will be transferred to that server. When you change the key of the CA certificate, you will be prompted for all ports of the node.js servers, one after the other. If you enter a valid positive port number, the data, including the new CA certificate, will be transferred to that server. This does not work in batch mode.
This action shows the subject and issuer distinguished names, and the start and end date of the certificate validity. It requires the computer name of the server or an empty name for the CA certificate, interactively or as a last command line parameter.
This action shows the subject and issuer distinguished names, and the start and end date of the validity for all certificates. It does not require any further data.
This action deletes the certificate, public key file (for the Sage X3 server) and the private key file from the output directory. The CA certificate cannot be deleted in this manner. It requires the computer name of the server, interactively or as a last command line parameter.
This action is only available if the "-notransfer" switch is not set. It will transfer the corresponding certificate, private key, and passphrase to the appropriate server, provided these files are in the output folder. It requires:
This is only necessary when you do not use the certificate generation tool to transfer the passphrase. It is done using the "passphrase.cmd" batch file or the "passphrase.sh" shell script (as described in Distributing the certificates to the node.js servers). This action encrypts the password of the generated private key on the server depending on the user (for example, on MS Windows using CryptProtectData). When it is invoked without further parameters, it checks the validity of the certificates. Otherwise, it sets and encrypts the passphrase.
The certificate generation tool makes two requests to the node.js server. One for a Diffie-Hellman key exchange, and another one to transfer the data, encrypted with the common secret Diffie-Hellman key and signed with the private CA key. The tool authenticates using the private CA key and the node.js server authenticates using the public CA key. The reachability by the server name is set as the subject common name in the server certificate.
The setup generates a special folder for certificates and keys, and writes its path to the "nodelocal.js" file.
In the certificate folder, there is a subfolder with the computer name in lower case containing the following files:
Note: The purpose of the subfolder within the certificate directory is to avoid problems when the administrator chooses to install everything on a network drive. In such a case, the certificates of the different servers have to be stored within the same folder. The subfolder and its files' access rights must be limited to the operating system user under which the node.js processes will run.
The entity for certificates (Administration > Certificates > Certificates) and CA certificates (Administration > Certificates > Certificates of Certification Authorities) contain the metadata for the certificates and private keys:
The certificate entity also contains:
Some certificates are only useful for one server (for example, SSL server certificate). The corresponding instance of the host entity is placed as a related instance to the certificate instance. When there is no instance, the certificate is stored on all hosts and is transferred to servers where the certificate is missing during startup. This applies when new servers are added to the cluster, for example.
The fields for the certificate, the private key, and the passphrase are input fields only. However, you can update the certificate alone and leave the private key unchanged. The following consistency checks will be done:
The instances of the certificate entity and the CA certificate entity (which correspond to the administrator-generated certificates) will be marked as read-only.