
X3 objects ergonomics
Software developed with Safe X3 technology is organized in functions, each function corresponds to an entry in a menu. These functions present a standardized ergonomics, and follow different templates. The object management is one of these templates (the others are the inquiries and the processes).
This documentation describes the ergonomics linked to the object management when using a Windows Client workstation or a Web browser. In Version 5, both ergonomics are very similar. The differences, when there are any, are signaled by the pictogram  .
.
The general operation principle of an object is as follows:
- An object allows the management of a table or group of tables in creation, modification, display and deletion modes. These tables can contain:
- fixed data (country tables, accounts, BP records, product records, BOMs, etc.),
- parameters (Workflow, Users...),
- or movements (postings, work orders, orders, receipt slips....).
- Except in the specific case of management in tables, the data linked to the key value of the main table (and the data corresponding to the linked tables) are displayed on a single screen or a group of tabs, the right-hand side of the screen being organized into lists making it possible to navigate from one record to another. In this way, an object can present a customer, a product, a Workflow event, an order with its lines, a posting with its details and its analytical sub-detail, etc.
Basis elements for the object management
Associated setups
The management of an object can be setup by the user to a large extent, namely using the Object personalization function, and the definition of the Object properties, but also by means of a set of general parameters.
- LFTBOX (defined at User level): Number of elements in the left list
- NBRCHOOSE (defined at User level): Number of elements for selections
- NBDERLUS (defined at User level): Last read number
- CHDERLUS (defined at User level): Loading of the record last read
- SELGLO (defined at User level): Global selection
- CONFDUP (defined at User level): Duplication confirmation
- CONFABD (defined at User level): Abort confirmation
- AUZMEMO (defined at User level): Create all memos
- SELWARN (defined at level): Threshold for memo control
- CONFABD (defined at User level): Abort confirmation
- ADXLIG (defined at User level): No. of lines displayed in grids
The different elements in this management are described in the following document.
Menu bar and Button bars
In Web mode, 3 bars make it possible to access software functions available in the screen header:
- The upper bar or menu bar gives access to functions linked to the context: File, Print, Display, Navigation...).
Example:

The dedicated documentation General ergonomics gives a detailed description of the functions available via the menu bar.
- Here is an example of the second bar, which is sub-divided in 3 zones:

1 - The navigation zone, presenting the access path to the current function, and containing the two following icons used to navigate from one function to the other: 
The dedicated documentation General ergonomics gives a detailed description of how to use this zone.
2 - The control zone that can contain one or several of the following icons indicating the status of the current record and the buttons used to navigate from one record to the other:
| Message being sent (moving icon) |
| Inquiry only |
| Record locking indicator |
| Attachment |
| Selection saved |
| Comments |


3 - Zone containing the icon to exit the function:  .
.
- The third bar, the button bar, is used to implement standard actions either via button, or via icons, such as: Create, Delete, New record...
Here is an example:

In Client-server mode, two bars are available in the upper screen, as well as a group of buttons at the bottom of the screen:
- The upper bar gives access to the menus File, Print, Display, etc., as well as to contextual menus. The documentation dedicated to the General ergonomics gives further details on this bar.
- The second bar looks like this:

It contains: - First, the set of icons presented here below, each corresponding to a menu option. The equivalent at menu level is provided in the description of the menu bar.
- Second, the navigation zone, operating in the same way as in Web mode: it contains the access path to the current function and enables navigation from one function to another. The dedicated documentation General ergonomics gives a detailed description of how to use this zone.
- The row of buttons located at the bottom of the screen enables standard actions to be implemented, such as: Save, Create, Delete, etc. as well as some contextual actions.
- Moreover, icons on the status of the record can be found below the button bar:
| Message being sent (moving icon) |
| Inquiry only |
| Record locking indicator |
| Attachment |
| Selection saved |
| Comments |

Entry into object management
Choosing a transaction
Some object managements are managed by transactions. A transaction describes a given group of tabs, whose contents can vary. Based on the user authorizations and the way in which the object management is called, the user will have access to a single transaction or to several. When the user has access to several transactions, a window called Choosing a transaction presents the list of possible transactions. Choosing one of these windows opens the object entry screen.
In the menu bar, the Select transaction option in the Display menu makes it possible to return to the transaction choice without exiting the function.
If the object is not managed by transactions, or if a single transaction is made accessible to the user, the entry is made directly into the screen.
Entry in inquiry mode
In some cases, the object management is accessed in inquiry mode only: it is then impossible to perform a creation or a modification. This can be the case namely:
- For authorization reasons, either globally (no record can be modified), or on a contextual basis (the current record cannot be modified, because for instance it is linked to a site to which the user has no access).
- For functional reasons (some of the tunnels from the inquiry functions, for instance). A tunnel being the ability to switch from one function to another by stacking the previous function and without having to go through a menu.
When this is the case, the  icon is displayed in the status bar:
Current record
On entering an object management, the last record read is automatically displayed if the CHDERLUS user parameter - Loading of the record last read (chapter SUP, group SEL) is set to Yes.
When it is set to No, no record is displayed. As a consequence, the right-hand side of the screen is devoid of data.
Management of a record
Creation of a new record
Creating a new record takes place either via the menu File/New, or via the shortcut + .
The fields in the record are then entered in the successive tabs. It is possible either to navigate from field to field via tabs, or to use the mouse to go directly to a field or to navigate between tabs.
Once the entry is considered to be over, the key is used to confirm the creation. In the event of an automatic numbering, the reference is then automatically displayed.
In Web mode, it is also possible to use the creation icon of a new record  present in the top bar, then to validate the record using the icon
  .
.
Inquiry and Modification of a record: Concurrent management and locking
A record can be selected by means of a left list; but it can also be selected by direct entry of the key for an existing record in the object screen (in general, the key is the first field(s), present in the header if there are several tabs).
Two management methods can be used to define the way locks are performed in record modification mode. The firs one, used by default, is the pessimist mode. The second one, which can be chosen by checking the box Lock in modification in object personalization, is an optimistic mode. They are described below.
Lock in pessimist mode
When a record is selected, this record is considered to be under modification. In other words, any other user selecting the same record will notice the following lock icon in the status bar at the top of the screen ( in Web mode) or at the bottom of the screen (
 in client-server mode).
Modifications will thus be impossible, except if in the meantime the user locking this record has finished the modification and has changed record. Double clicking on this icon makes it is possible to know the name of the user locking the record.
It should be noted that this type of locking is a "logical" locking obtained by the creation of a line in a lock table (it is not a transactional lock in the sense of a database). Such a lock can, in exceptional cases, remain active (for example following the sudden interruption of a user session, even if the user session is identified by a unique number, thus reducing this risk). In any case, a dedicated utility makes it possible to view these logical locks, and to delete them, if necessary.
In Web mode, when a field has been modified, the button  located at the top of the screen appears. By using this button or the key it is possible to save the modification; conversely using the
  makes it possible to abandon the modification and to return to the previous state.
Lock in optimistic mode
A record is not locked when it is selected. This means that any other user that selects the same record will be using the same method, whose symbol is: 
If a user tries to modify a record, the message "To perform this operation, click on the lock icon" is displayed (the lock icon is represented by a blue book). Clicking on this blue book will trigger the locking of this record (unless it is already locked by another user, in that case the message "Being modified on another workstation" and the padlock icon will appear).
Once the record is locked, the "Save" + "Abort" buttons become accessible, while the other buttons stay grayed out. The "Save" or "Abort" buttons have to be used to leave the modification and come back to the previous window. Any modification by any other user will be denied, and the icon will remain displayed: the user who is modifying the record can be displayed by double clicking on this icon.
In this mode, deleting a record will be possible only after the record is locked by double clicking on the lock icon. Once done, the record can be modified or deleted via the corresponding buttons which are not grayed-out anymore.
Record duplication
A duplication is obtained by a simple modification of a record, from the moment that the key identifying the record is modified. If the field that constitutes the key is obtained by automatic numbering, the simple erasure of the field is enough.
In Web mode, the key  appears, and the mere clicking on it, or pressing of the key puts an end to the duplication.
In client-server mode, the button becomes active, and clicking on it ends the duplication.
Since any inattentive user can easily duplicate an existing record by mistake, it is possible to define, by means of the CONFDUP setup, a warning that appears when a duplication is in process (when it is still possible to abort the operation).
Deletion of a record
After a record has been selected, it is possible to delete it:
- In web mode: by clicking on the button

- In client-server mode: by clicking on the button .
It should be noted that:
- Deleting an object is not possible for all objects (the button in this case remains grayed out), or it is impossible under certain conditions (for instance, posted invoice, final posting)
- This deletion will lead to a verification phase that can last a while: it is only possible to delete a product if it is not referenced in any order, quote, or stock transaction, for instance. Pressing the deletion key opens up a window requesting confirmation of the deletion and displaying messages relating to the checks under progress. In this window, a checkbox makes it possible to request a deferred deletion. In this case, the modification request is simply recorded to be executed at a later time, either in batch mode, or via a dedicated function.
- The deletion is a physical deletion (the deleted information will disappear from the database). In some cases, a checkbox called Active can be unselected in order to prohibit the use of the record (for instance, an inactive accounting journal can no longer receive movements).
- Obsolete movements will be deleted via a dedicated purge function capable in addition of stocking the information in a separate archive.
Left list
|
| |
The icon visible next to the triangle enables the initial size of the list to be enlarged or reduced |
|


If this list is not correctly displayed, or not displayed at all, modify the font. This parameter can be done via the welcome screenOptions/tab Fonts and styles,General category (the font applied by default is: MS Sans Serif- 8 pts for an optimal display).
The various sections
There can be different sections in the left lists. The section of the left list that will be displayed by default is selected at object personalization level. It can either be the main section of the left list or the last read section. Clicking on another section is enough to display the content.
When the number of records is larger than the display ability of the section, the icons | Example of a left list (customer record)
| |
| An example of a picking section (authorization entry)
|
 appear and are used to display the next/previous pages contained in the section.
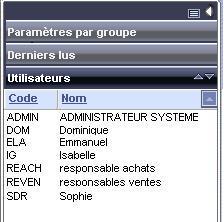
Navigation and selection within the main left list
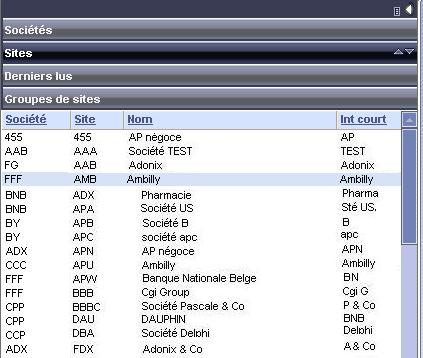
The main left list is displayed in the form of a set of columns presenting the fields of the on-line tables in the object, each line in the list representing a line in the main table, as illustrated in the example below:
The fields displayed in this left list can be set up by the user (via the object personalization function). The principle is the same for the default presentation order, defined by an index in the main table. The number of lines displayed is limited by the user setup NBRCHOOSE. The operations that can be carried out on this list are the following:
|
|
- Search on the lines in the left lists, by adding criteria on the fields present in the list. A criterion is defined using a right click on the title of one of the columns in the list. It is then possible to enter values just below the title of each field, according to one of the following ways:
>VALUE | in order to only view the lines where the value of the column is greater than the given value (in the same way, >=VALUE, <VALUE,<=VALUE are possible) |
a template including the wildcard characters | (* meaning any number of characters, ? a single character, # meaning a number). |
nothing | In that case, no criterion has been defined for the column |
In Web mode, an arrow  is placed in the left hand side following the name of the list being used, to indicate the presence of a selection. The title of the columns on which a filter has been applied is displayed in italic. A screen tip placed on this arrow indicates a Selection in process. A click on the arrow deletes the selection.
In client-server mode, a green dot mentions the selection under progress, and an ascending or descending triangle signals the sort applied to a column.
It is important to note that by using the after entering a field, the cursor moves to the next field, which makes it possible to apply a criterion to each field (only the lines corresponding to all the criteria simultaneously are retained).
Upon validation using the , the left list is loaded according to the selection performed. Warning, if the criteria are complex and the table is large, the loading of the left list can take several seconds.
It should be noted that in addition, the criteria given here combine (by additional filters) with the criteria given by the general selection or any memos used.
- Finally, clicking on a line in the list selects the record in question. If a modification is already in process, a warning message is displayed: The current modification has been modified. Do you want to cancel the modification?Yes validates the record change, the modifications under progress are then lost. No enables the user to remain on the current record. This behavior can be deactivated by use of the CONFABD setup.
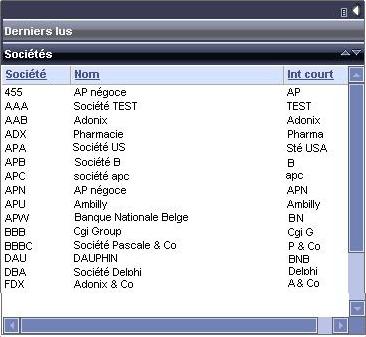
Navigation in the Last read list
The display of this left list section is optional (setup performed object by object at the level of the object personalizations function). The records last accessed by the user are displayed in the historical reverse access order (from the most recent to the oldest access).
It is used in the same way as the main list, to select a record by clicking on it. The number of lines in this list is limited by the LFTBOX setup.
It is possible to sort the lines in the order of a column, but it is not possible to set selection filters by right click on the column, or to read the next lines in order.
Link explorer
- a meaning defined in a miscellaneous table (number 61) that can be set up freely. For instance, a link of type "is satisfied by",
- an object and a start key (for instance, the customer object and the DUPONT record),
- an object and end key (for instance, the product object and the CD100 record),
- a code used to define the display conditions for the links between users.
In the situation of a sales management, a link could be established, such as: Customer DUPONT is satisfied by product CD100. In the customer link explorer, if the customer DUPONT is selected, there will be display of the link in the form of is satisfied by the product CD100. But is is also possible to find a link to another customer, in the form of know customer DURAND. All the links having the current record as their origin are displayed. By double click, it is possible to view the links from a linked record, and so on, in a tree structure organization. For instance, a list such as this one is obtained:
|
|
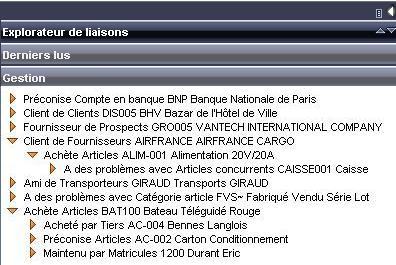
By positioning the cursor on a line with a click, the user is automatically passed by tunnel to the record defined here. In this way, for example, by clicking on the third line in the list, the user passes from the customer DUPOND to the management of the supplier GRO005. When exiting this record, the user is automatically taken back to the original record.
The menu Navigation / Links which is presented in detail in the documentation dedicated to the general ergonomics, is used to create links manually. The object personalization function is used to create links automatically when records are created.
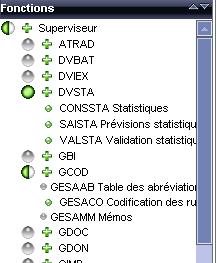
The picking sections
|
| A line represents a group of data when it is accompanied by the pictogram A double click makes it possible to display the data. A click on a line representing a group selects or de-selects all the lines in the group (the button representing the group being colored green A click on a single line selects or de-selects uniquely the line (if the group is not uniformly selected or de-selected the button is half colored |
|
|
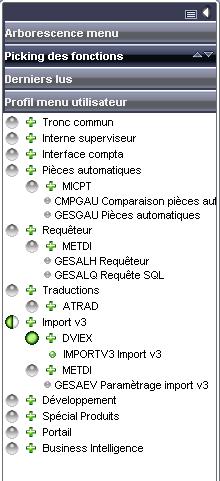
 ).
).In the previous example, the DVIEX menu is totally selected, but the Import X3 menu is only half selected.
A non branching picking section is displayed in the following form:
Unlike for the branch picking, it is possible to:
- Use a right click on the columns in order to only select part of the lines, by using the same selection possibilities as in the main left list.
- Sort the lines in the order of the columns by clicking on the header of the column.
Table management
The specificities linked to the table entry are detailed in the annex document Table management.
This document presents the procedures and functioning related to:
- the display of information
- the loading of lines
- the sorting of the columns
- the display in record mode
- the display in graphical mode
- the search functions.